Showing posts with label Magic House. Show all posts

May 8, 2013

We turned our patio into a CATio!

Blog, this spring we could wait no longer to create an outdoor space for our cats that would permanently and completely thwart their escape attempts. While Cody is pretty well trained to stay on the concrete pad, and the girls are a bit on the lazy/homebody side, new resident Archie gave us no indication that he wouldn't take off after the first bird that appealed to his wild Tabbysinian breeding.

So, it was time to turn our patio into a catio! Well Blog, I puzzled and researched and found that there wasn't anything similar online to our situation that offered a good solution. You see, the Magic House patio is surrounded by house walls on two sides and an evergreen hedge on 80% of the hypotenuse of the space. All we needed was a way to make the hedge impenetrable, as well as a means of closing up the entry gap.

After much thought and deliberation, I determined all we needed was these four items you see on the left, and a cat gate. Not much expense at all from Amazon, and pretty simple! So here's how it went down, Blog....

After much thought, I decided the least visually obtrusive way to deal with the hedge was bird netting. I got a package of black Bird-X netting in a 7' x 20' piece. I started by cutting the piece in half the long way, yielding 40 feet of netting that was 3.5 feet in height. I took Makai's nylon paracord in a nice dark moss color, and wove it through the netting on the bottom edge. Yes, that was time-consuming, Blog.

I ran this netting under the hedge, as far back from the edge of the patio as it would go, and tacked it down with Dalen steel garden staples, keeping the cord as tight as possible. I got 20 staples for the approximately 35 feet of hedge we have, and I'm going to supplement them with another 20 just to keep that cord snug to the ground.

Lastly, I filled in all the gaps under the hedge with netting, by hooking it on branches and affixing it with green Velcro plant ties here and there to hold securely. Yes, Blog, that was also time-consuming. The toughest part was blocking the area between hedge and house. Naturally that weak point was the first place Archie tested the system, so I had to adjust it immediately. Naughty tripod kitty...well, can't really blame him for being curious on the first venture outside since he made his home with us!

The entry way to the patio was the final issue, and happily while I was installing the netting, FedEx delivered the new cat gate! I used a Cardinal Versagate pet gate because it is stable, has flexible side panels, and has narrow gaps between the bars to block small tuxedo and Tabbysinian cats. That was ALSO time-consuming, Blog--I can't really recommend this gate on the grounds of easy assembly. However, it did work out to be just the perfect design for the job.

So, now we have a catio where cats will be able to play and rest contentedly with minor supervision, and humans will no longer be required to watch with vigilance and give the felines timeouts when they try to sneak away. Spring weather has arrived late in Wisconsin, Blog, but we were prepared for that first 70-degree day so our guests and cats could party together in perfect harmony!

January 27, 2013

How to have a MacGyver Party!

Blog, for the first time ever I think I've come up with something never before imagined by mankind. The MacGyver Party! I dare anyone to prove I didn't think of this first! Well, enough boasting...it's time now to tell everyone just how they can host their own and wow their friends and family with the amazing fun.

The inspiration for a MacGyver Party is, of course, the hit 80's show about a secret agent whose special talent is creating useful gadgets from everyday items at hand. And that's exactly what you and your guests will do! Here's how it went down at Magic House:


For Christmas I gave each of my daughters a MacGyver Basket. Said basket contained:

1 ticket to MacGyver Lunch
1 sturdy hanger with clips on it (like for pants)
1 "food saver" container
1 CD
1 magnet
1 sports bottle top
1 metal binder clip
1 balloon
2 wine glasses
2 socks (1 pretty, 1 plain)
2 votive candles
Decorative gravel (in baggie)
Kitty litter (in baggie)
Length of yarn


Random, hey blog? What can come of this? Well, that's the fun of it: your guests will be stumped. The other fun of this is that with a little effort you can find everything you need, including the basket, for under $15 a person. Tip: The toughest part for me was finding the sports bottle tops, but I bought them online from Dick's Sporting Goods.

IT'S PARTY TIME OH THE SUSPENSE

So, start the party with some lunch, maybe a couple healthy dishes like Jeff Mauro's Mini Veggie Burgers with Cuke Sauce and BBQ Kale Chips.

After the meal, prepare the table by laying down newspaper or paper bags at each place, to protect the tabletop. Give each person a pair of scissors and a needle big enough for sewing with yarn. Set out Gorilla Glue and clear packing tape to share. In advance you'll also need to prepare the labels you see below, have cookbook, sunglasses, and cell phone handy, and (optional) have a pet toy for each participant who owns a cat or small dog.

So, the girls had their baskets at the ready and it was time to be MacGyverettes!!!


PROJECT #1 - Cookbook Hanger

Get your guests stoked with with the easiest project of all. Tell them to grab their hangers, then take yours and show them how it works in your kitchen...


Yes, that's all there is to it, Blog! The hanger works great to suspend a lightweight cookbook or a recipe or two at whatever handy spot in your kitchen you choose. Wowzers.

PROJECT #2 - Refrigerator Clip / Pet Toy 

Glue the binder clip (I got these pretty ones at Target) to a nice, powerful magnet using Gorilla Glue. Set aside to dry...you'll be able to finish this project up in like a half an hour. The clip works to hang something from your fridge that doesn't hang too well by magnet alone, like thick cardboard.

While you're at the gluing, now's also the time to glue the sports bottle top to the CD, like you see in the photo. (Don't make the mistake we did and try this with superglue. Gorilla Glue is the only adhesive for this job, and make sure the seal is firm and tight all the way around the topper. No need to be neat!)


Back to the Refrigerator Clip: It also works great to attach a pet toy via a piece of the provided yarn, so it will dangle from the fridge door and provide kitties or pups with hours of fun. Man, did our Archie the Three-Legged Cat love it!


PROJECT #3 - Glasses Case

To do this project you'll need to have a rudimentary knowledge of sewing: enough to be able to thread a needle with yarn, tie a knot in the end, and whipstitch an edge. Take your sock, put your sunglasses inside, and trim down the cuff to the desirable length with your scissors.


Whipstitch the edge so it doesn't unravel. Ta-da, an easy case to protect sunglasses or reading glasses from getting scratched in your car, purse or drawer!


PROJECT #4 - Electronic Device Resuscitator

You may never use this thing, Blog, but if you ever have need of it, you'll be SO glad you kept it handy! Take your food saver container, and with clear packing tape apply the label (prepared in advance by the hostess, of course) to the lid. Put the other sock from your basket and the bag of kitty litter inside.


Heaven fore-fend you should ever get your phone, iPod, or other gadget wet (like when I dropped my continuous glucose monitor in the toilet)...but if you do, rush to this kit. Dry off the gadget, turn it off if still on, remove the battery, and put gadget and battery inside the sock. Fold it over securely. Dump the litter in the container, bury the sock in it, close the box and leave it overnight. The sock will keep the gadget dust-free, and the litter will absorb all the water. There is a decent chance your device, like my DexCom, will be revived after being reassembled and rebooted!

PROJECT #5 - Wine Glass Candelabra

Decorative gravel, votive candles, and wine glasses combine to make a lovely table decoration, as your guests will see in seconds! Just watch my sleight-of-hand:


Ta-da! Masterfully completed in nanoseconds and ready to inspire romance!


PROJECT #6 - CD Hovercraft

Yes, Blog, I said hovercraft. Let's go back to the sports bottle tops glued to the CDs, and get out our balloons. Simply make sure the top is pushed down (closed)...blow up the balloon and put it over the top securely...set it on a flat surface...and pull up on the top (without pulling off the balloon). Release and watch the fun! Especially if a cat is present!


OMG, what an awesome party this was! Now your guests can pack up their six way cool contrivances in their baskets and go home with new swag and a sense of cleverness and accomplishment! Thanks, Mr. MacGyver, for the inspiration!

And I bet you never heard of anything like this before, didja, Blog?

August 27, 2012

A Bird House, as in, if birds built a house

Blog, bird houses and the making thereof are nothing new. But the other night I asked myself, if birds had opposable thumbs and carpentry skills and tiny tools, what sort of houses would they build? The construction would be more elaborate that you see in your typical nest, but wouldn't there still be a bird-ish sense of style? Twigs, twine, bits of found objects? And seriously, how cool would the result be?

This cool:


Yes, I decided to make this daydream come true with my own crafty crafting skills.  What a blast I had too, in the nine hours it took me to construct this Bird House from the ground up.  I dare say I called upon almost every skill, tool, and technique in my repertoire (and also benefited from some lessons I'd learned from previous mistakes).  I'm pretty stoked about the result if I do say so myself.

Here's how it all went down.

First off, I went around the house gathering up all the materials I had on hand that a bird might use if he were some feathered combo of Mike Holmes and Scott MacGillivray. I also perused the neighborhood for twigs and pine cones.  Here's the stash I compiled to your right.

I happen to be a sucker for driftwood, rocks, moss, silk plants, and other natural or faux-natural materials, so I had a lot of that around. I also had things like wood scraps, jar lids, a tiny flower pot, charms, felting wool, potpourri, ribbons, buttons, yada yada.

So, I started with a basic construction plan. For that I needed a sturdy base and some components to serve as a basis for the rooms of the Bird House. I fooled around and ended up with this set of items that looked like they would work.


That dome on the left is a broken wine glass. I was really sad when I found the glass had broken on the way home from our vacation, but it occurred to me to save it in case it would come in handy one day.  A couple months later...heck yeah! (I should mention here that I'm not as huge a packrat as I seem--all my craft equipment, tools and supplies would fit easily in a medium size closet if consolidated.) I got to employ my Dremel tool to do a little woodworking, always a thrill!

Now, how to make these items look like bird construction materials.... Well, one polymer clay technique in my arsenal is the making of faux wood.


Here are "veneer" sheets ready to be applied to the boxes. I also had some leftover faux marble-like stuff that was a good fit for the project. So here's the main box covered with faux wood, with a stone and wood door with iron hardware added.


The lump on the side is a piece of stick mounted in place, which was to support the patio deck. I really had to apply my engineering skills a few times during this project.

And here to the right is the wine glass, which I confess worked out even better than I hoped. I cut windows in the clay on both sides so the light would shine all the way through.

Now of course it's nice to vary the building materials a bit. I thought it would be cool to have some stone walls, but I didn't want the rocks to be falling out all the time. So I reasoned that birds might make the walls of mud and small rocks mixed together, so I went for that. I'm not gonna lie, Blog--doing this on the four sides of this room took a very long time. Anyway, here's the room with just mud, and a doorway cut in the front of the box.


I also covered the jar lid with the same stone stuff as the front door, and applied some wood vines to the jar itself. Everything was ready to bake at last. While the pieces were in the oven, I fixed up my little flower pot with fake dirt and flowers. I also used resin in one of the jar lids to look like water, and glued birdseed in the other lid. The oven timer went off...

Not bad, but I wanted to add a mossy look to my faux wood. You know Blog, like the actual sticks I was using had. So, I used Swellegant faux finish for this; the copper paint turns green, so it worked like a charm. Meanwhile, I also added rust patina to the door hardware.

I gathered all the key components, hammer and nails, and my Gorilla Glue and went to town putting everything together. Here it is, the basic construction of the Bird House:


Now, you see in that shot that I already did some festooneries on the jar. I mounted a tea light inside the lid (with a cunning design of rubber bands and electrical tape). I put some moss in the bottom and settled in my little bird's nest from a previous project. Voila, an incubation room to provide relief to a busy bird mom! Ribbons and a pine cone finished it off--for now, anyway. You also see I used a mushroom Christmas ornament to top off the wine glass. It has an opening in it, and inside I tucked a little cushion of moss.

So, after a break for dinner and TV with Davie, it was time to come back and do the rest of the festoonery. Now this is the truly fun part! I got out my white wood glue and my Superglue, and went to town--as you will see in the detail shots here.


Mama bird is from the aforementioned previous project. And here you see how the mud-and-rock wall came out. Some sticks, a potpourri pine-coney thing, ribbon, moss, and a golden leafy vine charm compliment the beauty of the wall. Inside the room is some comfy, curly wool...this is, after all, the master bedroom.

Atop this room is the windowed cupola, candlelit inside for cozy reading or billing and cooing. It's crowned with the mushroom playhouse, currently occupied by the resident family's fledgling daughter. Festooneries here include twine and fungus, neat.

Talk about curb--er--branch appeal...check out the front door of the bird house's "great room." I framed up this part of the building with pretty sticks and a stately pine cone. The rosebuds and little seed cluster thingies were in my potpourri bag. I made a "wreath" from a button and some ribbon. And the welcome mat is flower petals.

Here's the final shot of the nursery. Moss conceals the glue around the pine cone topper, and decorates the base. I think you can tell, Blog, how much I dig moss.

Closeup of the nest. The eggs and sticks are polymer clay, and I also used bits of thread to construct the nest.  Chip away, little hatchlings!


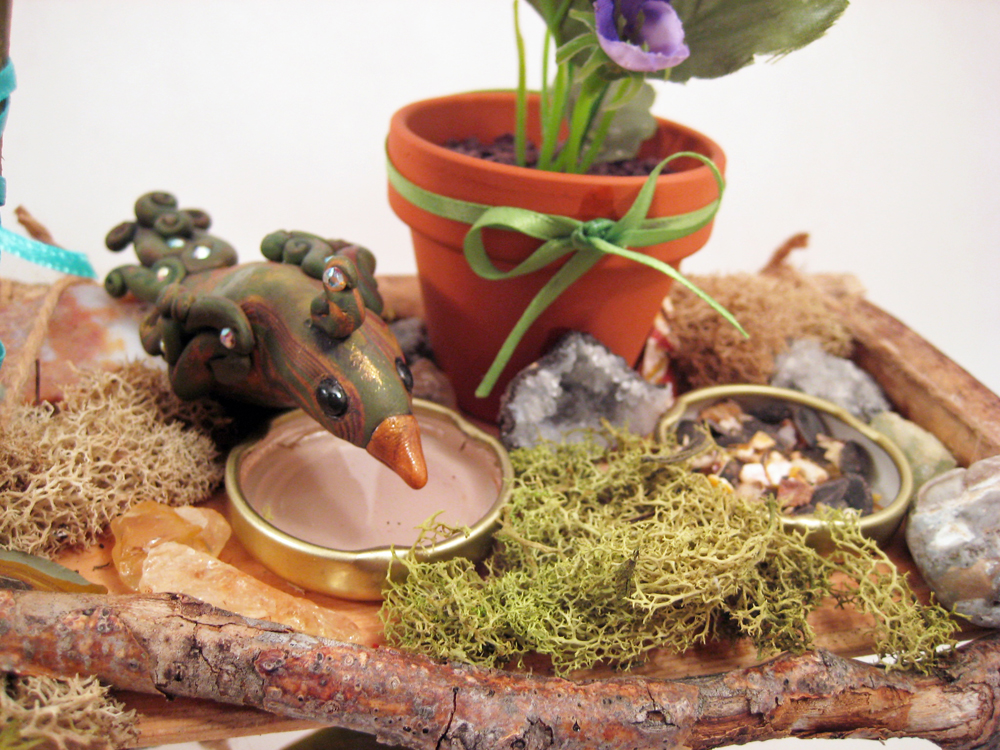
The patio is a great place to entertain guests, or just relax and refresh. The family can enjoy water and food in a spacious setting framed out in rustic sticks, and resplendent with greenery and a collection of beautiful stones and raw gems. Here the daddy bird, also previously made, enjoys a drink in the shade of the potted plant.


Beneath the patio is the leaf swing, a real leaf (from the potpourri) hung on twine ropes. A great place to "hang out."


Of course I had to make sure the back of the house was also attractive--don't want the neighbors to have a boring view!  By the way, the toppers on those two tall sticks were more weird natural items from the potpourri bag...no idea what they are, but they look nice!


Here's a close up of the back wall. Tiles leftover from our bar backsplash project fit right in with the faux wood, and support more clumps and dangles of fun moss.

The Bird House looks uber-cozy by night.


The candle flickers in the cupola room.

And the eggs stay cozy in the nursery.


And here, Blog, is the Bird House as a centerpiece in our dining room. I'm expecting the birds on our patio to be pounding on the patio doors asking for a home tour.  You know, like aviary House Hunters.


So, Blog, that's the story of what happens when our feathered friends meet HGTV. At least the way we imagine it here at Magic House....

[For larger resolution images, see my Flickr feed.

April 27, 2012

Aggie illustration swag revealed

Per my promise, Blog, here's the cool stuff I got incorporating Anna Rettberg's beautiful illustration of Aggie and her heroes.

I ordered this 30 x 10 print from Bay Photo, mounted on gatorboard with offset (so it "floats" on the wall) and laminated. It looks so amazing here.


And I also ordered a mug from Cafe Press. The illustration's layout is perfect for this. I'm drinking out of it even as I type this!


Aggie fans, if you want to order your own print from Anna's online store, here is the link!

April 22, 2012

The Magic House art collection

Blog, here are two of the great things about my life:

(1) I get to meet and know a lot of creative, artistic people, and
(2) My husband loves to shop.

The cumulative effect of these two factors is that my home, aka Magic House, has acquired quite a collection of art pieces I really love. Oh, I'll add modestly that I make a lot of stuff of my own, and sometimes it turns out good enough to display proudly as well.

Yesterday I completed a project I'd wanted to do for awhile: inventorying our art collection. We have over 100 pieces of wall art and displayable objects, so many that we sometimes have to rotate them in and out, like a real gallery. It was fun for me to really appreciate and savor each piece by recording it, the artist, the place we got it, and its current location. (And yes, I am a little bit anal-retentive, why do you ask?)

I photographed a sample of things...some that are my favorites, and some that just seem representative of the sorts of things we collect.  And here they are:

Frank Lloyd Wright Bradley Skylight glass panel, and ceramic bowl with "rock heads" by a local artist whose name, alas, I have lost.

One of our prize possessions, the "Time Travel Orb," which is a fused glass ball with a floating boulder opal by James Yaun. The faux metal cat scupture was made by me. Also love this side table, with a concrete top with embedded rocks, one of a kind, by a Wisconsin company.

Also prized: original Route 66 Polaroid photo by our daughter Katie's boyfriend Chris Robleski (yes, we are fortunately to have a slew of his stuff on display), and painting of Santa Monica Pier bought for us at Dan Rice's Rt. 66 to Cali stand.

A total surprise gift from husband Davie, these are actual "etched" leaves in a shadowbox. Artist: Bookey Morey.

Print of a watercolor/ink landscape of Galena, Illinois by one of our favorite artists, Carl Johnson. We have five of his prints hanging in our house--this one is in the powder room.

Pizza house by Heather Goldmine, and Rinconada cat from Uraguay, on the living room window seat.

Centipede etching, #3 of 3, by daughter Katie Nelson, in the bedroom.

Milwaukee River Renaissance by Lynn Casper, in the bedroom.

A few years ago, Katie and I made custom ceramic cats for each family member for Valentine's Day. Each of us also got a photo of all four cats. Quill (for a writer) is mine, and Scrubs is Davie's (for his cleaning business).

I made this dish garden, which is currently on the wine rack under the installation of 12 of Katie's "textures" photographs.

Love this tile frame with a photo I took of Lake Michigan. Small root wood bowl with rocks. And the inimitable "Magic Bowl" which a local artist painstakingly made and now serves as our cats' water dish because they refuse to drink out of anything else.

If you receive/obtain/create beautiful things, it's very important to appreciate them, Blog. I make a point of walking around our home periodically, just looking at what we have. Beauty is one of the things that simply makes life worth living, wouldn't you say?